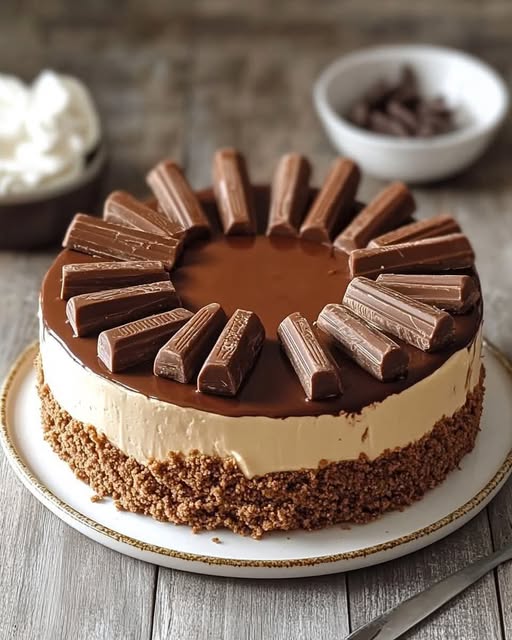
No-Bake KitKat Chocolate Caramel Cake: A Dessert Worth Celebrating!
Craving a dessert that’s rich, creamy, and irresistibly indulgent? This No-Bake KitKat Chocolate Caramel Cake is the perfect choice! With a buttery cookie crust, a velvety caramel cream layer, luscious chocolate ganache, and crunchy KitKat bars on top, this cake is a guaranteed crowd-pleaser. Best of all, it’s easy to make and doesn’t require an oven. Let’s dive in!
Ingredients
For the Base:
- 2 cups chocolate cookie crumbs
- 1/4 cup unsalted butter, melted
For the Caramel Layer:
- 1 cup cream cheese, softened
- 1/2 cup powdered sugar
- 1/2 cup caramel sauce (store-bought or homemade)
- 1 cup whipped cream
For the Chocolate Ganache:
- 1 cup semi-sweet or milk chocolate chips
- 1/2 cup heavy cream
For the Topping:
- 1 pack KitKat bars, broken into sticks

Step-by-Step Instructions
1. Make the Cookie Base
- Combine the chocolate cookie crumbs and melted butter in a mixing bowl. Mix until the crumbs are fully coated and the texture resembles wet sand.
- Press the mixture firmly into the bottom of a springform pan to create an even layer.
- Refrigerate for 30 minutes to set.
2. Prepare the Caramel Cream Layer
- In a large mixing bowl, beat the cream cheese and powdered sugar until smooth and creamy.
- Add the caramel sauce and mix until well combined.
- Gently fold in the whipped cream to maintain a light texture.
- Spread the caramel mixture evenly over the chilled cookie crust. Return to the refrigerator and chill for 1-2 hours to firm up.
3. Make the Chocolate Ganache
- Heat the heavy cream in a small saucepan over medium heat until it just begins to simmer (do not boil).
- Pour the hot cream over the chocolate chips in a heatproof bowl. Let sit for 2-3 minutes, then stir until smooth and glossy.
- Allow the ganache to cool slightly before pouring it over the caramel layer. Use a spatula to spread it evenly.
4. Add the KitKat Topping
- Once the ganache is slightly set, arrange the KitKat bars in a decorative pattern on top of the cake.
- Refrigerate the cake for an additional 1 hour or until fully set.
5. Serve and Enjoy
- Carefully remove the cake from the springform pan and transfer it to a serving plate.
- Slice with a sharp knife, wiping the blade clean between cuts for neat slices. Serve chilled for the best flavor and texture.
Why You’ll Love This Cake
- Simple and No-Bake: Perfect for when you don’t want to use the oven.
- Show-Stopping Presentation: The KitKat topping adds visual appeal and a delicious crunch.
- Layered Perfection: Every bite combines a crispy base, creamy caramel, smooth ganache, and crunchy chocolate bars.
Pro Tips for Success
- Use Room-Temperature Cream Cheese: This ensures a smooth caramel cream layer without lumps.
- Chill Properly: Allow each layer to set fully before adding the next to achieve clean, defined layers.
- Get Creative: Swap out KitKats for other chocolate bars like Twix, Snickers, or chopped nuts for a personalized twist.
FAQs
1. Can I use store-bought caramel sauce?
Yes! Store-bought caramel sauce works perfectly for this recipe, but homemade adds an extra special touch.
2. How long will this cake keep?
Store the cake in an airtight container in the refrigerator for up to 3 days.
3. Can I use a different type of chocolate for the ganache?
Absolutely! Dark, semi-sweet, or even white chocolate can be used depending on your preference.
Serving Suggestions
Enhance your dessert experience with these pairing ideas:
- A Scoop of Vanilla Ice Cream: The perfect complement to the cake’s rich flavors.
- Fresh Berries: Add a burst of tartness to balance the sweetness.
- Hot Coffee or Espresso: A warm drink pairs wonderfully with the creamy, chocolatey layers.
Conclusion
This No-Bake KitKat Chocolate Caramel Cake is the ultimate indulgence, combining creamy caramel, smooth ganache, and crunchy chocolate bars for a dessert that’s both stunning and delicious. Whether you’re celebrating a special occasion or simply treating yourself, this cake will become a go-to favorite. Try it today and savor the layers of sweetness and crunch!